
I have a fantastic friend here in London who used to be my tutor and is now the source of most of my shocked belly laughs – he's crude and shameless and hilarious and I love being around him. So when he invited the BF and me to dinner at his house, of course we rearranged our schedules to make it work. I offered to make dessert, and my request for preferences was met with the line 'A tart sounds appropriate.'
Well, what could that be besides a challenge? (Okay, yes, it could be an insult, but it was written in a cheeky tone, not a mean one.) I immediately started going through my recipe bookmarks in search of the perfect tart – I wanted to make this super-easy showstopper, but of course we couldn't find raspberries anywhere in London in the dead of winter, so it had to be apple or pear. The tricky bit: as I had plans that day to go to the Taste of Christmas event, it had to be something I could make either very quickly or in advance. As it turned out, the recipe I used was a little bit of both.

I made the dough in advance, putting it together the evening before and letting it rest overnight. Then, before the event, I woke up early, rolled out my dough, lined my pan, and filled it with sliced apples – I tried to make them look pretty but as you guys know, presentation is not my strong suit.
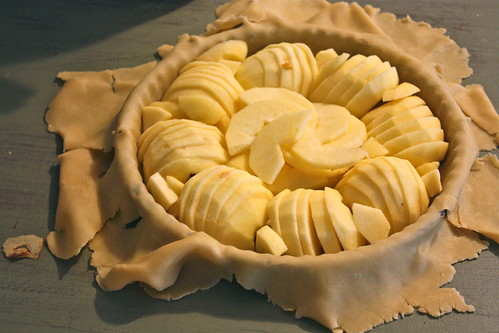
Nonetheless, despite a few comments on the recipe saying the dough was difficult to work with, everything came together pretty easily. Despite my tired eyes and concern about time, I found that the dough was co-operating and (especially with the BF's help enlisted to peel and core the apples) I was ahead of schedule.
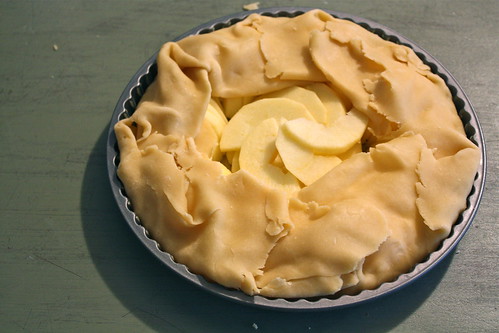
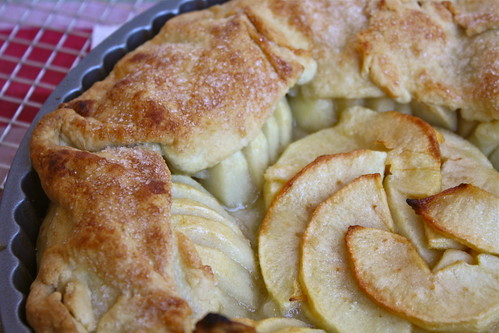
Even better: once I wrapped up the apples (I wrapped them a bit more than I should have, so all my fussing over slice arrangement was really for nought in the end), brushed the whole thing with melted butter, and sprinkled it with sugar, I was ready to bake!
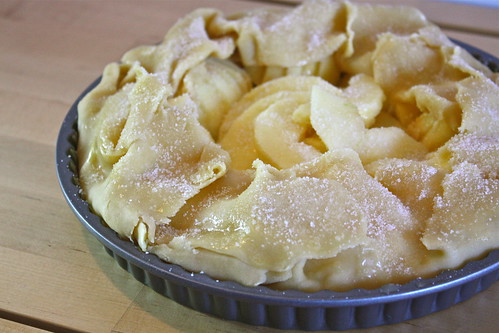
The tart came out of the oven twenty minutes before I had to leave, and I thought it looked beautiful – rustic and golden and classic. The juice and butter had splooged out of the crust where I must have rolled it a bit too thin, but I didn't think anyone would notice that (and luckily it didn't stick the crust to the pan too badly), and the smell was absolutely divine.
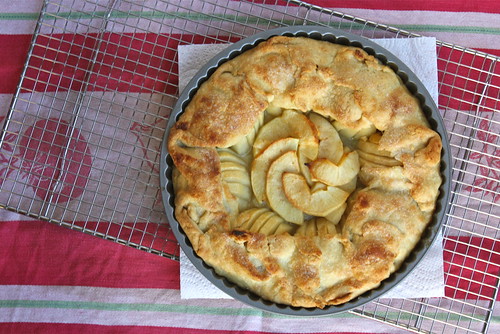
While the tart had been baking, I'd been simmering the peels and cores from the apples with a bit of water and sugar, and now I brushed the glaze over the warm tart, grabbed my bag, and headed out the door, praying silently that when I got home my creation would still be fresh, not soggy and cold.
And lo and behold, it was fine! I mean, it probably would have been that much more delicious pulled right out of the oven and glazed before the eyes of my adoring public, but since we had to take it over to our friends' house and wait to eat it anyway, that wasn't really an option. And you know what? I didn't hear any complaints! We picked up some vanilla ice cream on the way over, in case the tart itself wasn't sweet enough (the only sugar in it came from the glaze and the sprinkling, and a bit in the crust, so I was worried), and even though the tart was tasty on its own, the a la mode-ness really made it a nice dessert.
Of course, the real stars of the evening were our hosts, their gorgeous meal (and home), and their lovely little Singapura pussycat, but this tart was definitely a success, and something I'll keep in mind in the future as an easy, relatively healthy dessert that looks like more effort than it really is.
Apple Tart
barely tweaked from Smitten Kitchen
To make the dough:
1 c (125g) unbleached all-purpose flour
1/2 tsp (2g) sugar
1/8 tsp salt
6 tbsp (85g) unsalted butter, just softened, cut in 1/2-inch pieces
3 1/2 tbsp (50ml) chilled water
In a large mixer bowl, combine flour, sugar, and salt; add 2 tbsp of butter. Blend until dough resembles coarse cornmeal. Add remaining butter and mix until the biggest pieces look like large peas.
Drizzle in a little water, stir, then drizzle in more, until the dough just holds together. Toss the mixture with your hands, letting it fall through your fingers, until it’s mostly sticking together, with some dry patches. If dry patches predominate, add another tablespoon of water. Keep hand-tossing until you can roll the dough into a ball. Flatten the dough into a 4-inch disk and refrigerate.
After at least 30 minutes, remove the dough and let soften so it’s workable but still cold. Smooth any cracks at the edges. On a lightly floured surface, roll it into a 14-inch circle about 1/8 inch thick. Dust excess flour from both sides.
To make the filling:
2 pounds (910g) apples (Golden Delicious or another tart, firm variety), peeled, cored (save peels and cores), and sliced
2 tbsp (30g) unsalted butter, melted
3-5 tbsp (65g) sugar
Lay the dough in a lightly greased 9-inch round tart pan, or simply on a parchment-lined baking sheet if you wish to make a free-form galette. Heat oven to 400F/200C.
Arrange your apple slices on the dough in a ring up to the sides if using the tart pan, or two inches from the edge if going galette-style. Continue inward until you reach the center. Fold any dough hanging over the pan back onto itself and crimp the edges at 1-inch intervals.
Brush the melted butter over the apples and onto the dough edge. Sprinkle 1-2 tbsp sugar over the dough edge and the other 2-3 tbsp over the apples.
Bake the tart in the center of your preheated oven until the apples are soft, with browned edges, and crust has caramelized to a dark golden brown (about 45 minutes), making sure to rotate it every 15 minutes.
To make the glaze:
1/2 cup (100 g) sugar
reserved peels/cores from earlier
While the tart is baking, make your glaze. Put your reserved apple peels and cores in a large saucepan, along with the sugar. Pour in just enough water to barely cover them and simmer for 25-40 minutes, until thickened. Strain the syrup through a cheesecloth or fine mesh sieve.
When you remove the tart from the oven, slide it off the parchment (or just set it in its pan) onto a cooling rack. Let cool at least 15 minutes, then brush the glaze over the tart, slice, and serve.
.
I love these rustic kinds of deserts. Beautiful and delicious.
ReplyDeleteI nominated you for a Liebster Award over on my blog:
http://purpleclosetbeauty.blogspot.com/2013/01/sharing-is-caring.html
I hope you have a few lesser-known blogs that you would like to showcase too.
Thanks for the nom, PCB! I love this idea, and it's definitely on my to-do list, but these days my posts happen weeks after I decide on a topic... so please don't hold your breath waiting (as it is, it took me over a month to post this tart). I've bookmarked your post, though, and Leibster is on my list!
Delete